Sunday, November 29, 2009

71 Roadrunner 1:25th Scale--Color Coat

I'm happy to say the 71 Roadrunner 1:25 vintage build has its color coat! Finally! This marks the second psuedo-vinyl top I've created, and also maybe the second body I've tried to paint with my new airbrush setup....


After trying different airbrushes--including some fairly expensive ones--I think I've settled on the right one for this kind of job. It's a Paasche H0708, single action, external mix. It's inexpensive and simple to clean, perfect for painting model car bodies. To me double action and even internal mix airbrushes seem overly complex for paint jobs this basic. This one gets the job done.
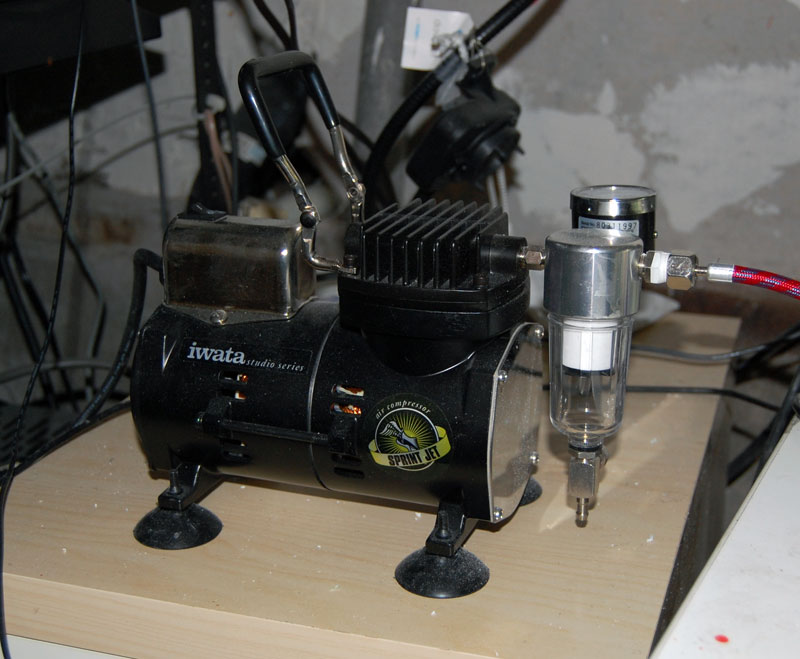


As I said in an earlier post: I replaced the putt-putt Testors compressor I was borrowing from a friend with a Iwata Studio Series "Sprint Jet". That's made a huge difference as well. The ability to dial in and view the PSI's of the paint "session", then try the pressure on some scrap, make adjustments, and paint, has made my color coats look a lot better.


Paint for this build is Scalefinishes.com "Dodge Y1 Top Banana". I chose this because I have applied lots of different color coats over the past couple of years but not yellow. This is the first body I've tried to paint with Scalefinishes.com color...their website says this is acrylic paint which, to me, seems easier to apply then lacquer.

Before painting I tried an additional step: I poured the paint through a cloth sieve, to remove any paint chunks that mixing and stirring didn't get rid of. The result was no blotches and splotches when spraying. Joy! I almost forgot to paint the side mirrors (not shown) but remembered at the last minute....


So here is the painted body so far. I've been here before with other builds, and have a long way to go. Still, applying the color coat is a milestone. Still to do: carefully 1500 grit sand the color coat (after letting it dry for a week!), Bare Metal Foil, decals, clearcoat, and then figure out how to put headlights on the grille.


Miles to go before I sleep? As I get (slightly) better at this, I also see things becoming more and more work. I can devote more time but it also means each build takes longer and longer, and I generally don't have hours each evening to work on these things. Cue up Sly Stone's version of "Que Sera Sera"....so earthy and funky that you drop the needle and nasty body odor starts wafting uncontrollably out of the stereo speakers...whatever will be, will be.

Sunday, November 15, 2009

Roadrunner Continues--and the Next Build....


Onward and upward....after a couple of bad weeks I am trying to get to the end of a 1:25 71 Roadrunner stock build. As I've said before, it's not hard finding a GTX in 1:24 scale, but 1:25 RR's are few and far between, far harder to find and thus more challenging....but to make this build not too difficult I also glued the hood shut. So once again I am not quite sure where my head is at with this build....anyway, the 71 Roadrunner sits in the paint booth awaiting more primer.

I have found that letting the booth blower run for 30 minutes before I start painting helps get some of the dust out....I did a lot of test fitting and made sure the side mirrors and bumpers had the means to be glued to the body without making a mess. The Gerald Wingrove book espouses doing ALL the building, testing fitting, and prep work before any paint and finish work, and that sounds like a great idea to me. I always seem to struggle to get trim and finish parts to fit, and if they are already painted it just makes things worse.

And now for something completely different....


The larch....the....LARCH.

Usually about now I start tinkering with my next build; for the Roadrunner I'm into watching-paint-dry mode, and don't want to just sit around staring at the supid thing.

I was thinking about finishing off one of the customs ("Kustoms") I started several months ago, but something came up on Ebay I couldn't resist--a unpainted (well, almost) glue bomb of a 1:25 66 olds 88 Dynamic.

Growing up I always LOVED this car--especially in convertible form. Like some of the big caddies, the Olds 88 got me into the "I wish I could drive" mode.


I have never seen this in boxed kit form anywhere, although 442 kits aren't hard to find. I also have never tried any sort of glue-bomb-to-slightly-less-of-a-glue-bomb type kit restoration.

In the end I just had to buy it--Joy! I won the bid for about $33; it showed up looking exactly like the Ebay photos. Nothing got broken in transit--the seller did an excellent job packing it up. The bad news is that whoever glued it really went to town, so getting everything apart to start the restoration is going to be tough. Also one of the crazy side pipes is broken, and the custom hood is chipped in one corner. So I not entirely sure what look I am going to go for. Stock would be nice, but it seems a bit dull after the last couple of stock builds I've done. This must have been a "2 n 1" originally and thus, just for nostalgia's sake, I might go for the "drag" version.


Man that's a cool blown engine!


A lucky break: the seller had some spare 66 Olds parts, including an entire additional engine with blower and dual carbs, which he included. I wonder where he got all these parts?

Sadly: someone had taken a soldering iron or firecracker or something to the original build. The ebay listing said someone had melted off the wheels (and you do see some heat damage inside the wheelwells, but fortunately what is visible is OK.) There are also a few burn marks on the body, like someone was trying to torture the poor thing, but nothing too bad.


The seller also threw in some really nice Olds hubcaps and a nice set of scale Firestone white wall tires. I just went through my entire collection the other day picking out tires for the Roadrunner; I have nothing like these 1:25 Firestones, and they are extremely sweet.

Thursday, November 12, 2009

71 Roadrunner: Vinyl Top

It's been a tough couple of weeks and sadly it's made me reconsider why I am doing any of this hobby. It's now apparent to me I'm not going to spend hours and hours on builds, and I will never be great at this; or maybe even good. Part of it is because I have a real life and a real job, a family that I am serious about, and am emotionally more invested in things that seem more important the glue and plastic. I read about the model car world of NNL and "Fierce Competitors" and it makes me laugh--I have zero desire to travel all over the country to compete, like the "master modelers" do....the whole thing reminds me a bit of "Best of Show"....competing? Why? What do the competitors hope to accomplish? If they're after the girls, I got news, good buddies....

But I just can't let myself build whatever comes out, I have to keep pushing to get better I guess--but, why? It's been a good learning experience, maybe. It's relaxing, sometimes, but maybe not often enough. Perhaps I am preprogrammed to try to be good (obsessively good?) at whatever I do, and maybe this is the universe's way of telling me I don't have to do that. Perhaps it takes a real gift to be satisfied with being mediocre at something that has no purpose other than relaxation.


I got a book by Gerald Wingrove on how he builds what I'm pretty sure are considered the best car models in the world. The book goes over, in extreme detail, HOW he builds his model cars. But it avoids a much more compelling question--WHY does he do what he does? Yep, Gerald's builds are impressive, really impressive, and man does that guy do some crazy stuff to build them (if you don't believe me, get his book). And he got to meet the queen!! But I have to ask--to the rest of the Gerald Wingroves of the world--why? What urges you on? The 12 year old kid from China playing the hell out of the violin: why? Did you listen to Paganini as a 4 year old and say--by god, I want to play like that! Be honest now: is it an early onset of OCD? Or a parent beating crap out of you if you don't practice?

This whole endeavor makes me ask what I've always wondered, and always lacked: what motivates some people to be obsessively good at one thing?


So enough of Gerald, and all the kids at Julliard. And back to the world of mediocrity: about this '71 Roadrunner....same as it ever was: I decided to add a vinyl top.....I used plastic strips to imitate the vinyl creases in the top; used Tenax glue for that, and sanded it down with a nail file.


Masking is obviously critical. I am effectively doing a 2 tone job here.


bare metal foil and Tamiya tape are used.....


There are two coats used for the Model Master's vinyl system, basecoat and finish coat, this is the second time I've been though this, first time was on the 69 Superbee, complete with crooked bumpers and the wrong side mirror. Avast!


There you have it. If I were Gerald Wingrove, I'd still be masking the first damn A pillar. Whatever floats your boat.

Saturday, October 31, 2009

71 Roadrunner 1:25th Scale--Body Work!!!

The story so far: I've been building a '71 Plymouth Roadrunner, using a vintage 1:25 MPC kit (MPC/Ertl #6282) as the build's basis. To complicate things I found the MPC front grille/bumper to not be to my liking, so I cast a new one using a Japanese casting product called Oyumaru, basing the new bumper on a Plymouth stock car from Competition Resins. Never can keep things simple, eh?


Priming is essential to see "where things are at" when doing body work, since the primer exposes areas that still need attention. Until now I have almost exclusively used Duplicolor primers; reading about what some of the "big boys" use, Plasti-kote T-235 seems more popular, so I decided to give that a try.

So far I have liked it--it goes on smooth, sands out easily, and dries fast. HOWEVER! I have read that you need to MAKE SURE you use T-234, T-235, orT-237 and not one of their other primers--their other primers might melt your plastic!

It might be my imagination, but it seems a bit thicker than the Duplicolor primer I've been using.


I had a few different parts choices for the interior, having bought resin parts for the build from Bandit Resins as well as Modelhaus. And, of course I had the parts that came with the vintage MPC kit.

I found that the seats and/or interior tubs were essentially the same from all suppliers; all vendors apparently cast their parts from the same master (a Plymouth dealer promo?). So it came down to which part looked and/or fit the best. I ended up choosing the MPC tub because it fit the body well(the Bandit Resin's casting was crisper then the yellow plastic MPC tub, but there was a gap between the BR tub and the MPC plastic body). The seats from Modelhaus were perfect--crisp, no flash, great looking. The dashboard is from Bandit Resins--the casting is wonderful. Both Modelhaus and Bandit Resins do great work!


The hand-made resin front bumper has been glued to the body at last. I am finding cleaning it up difficult. But to me the extra 2-3 or so scale inches the new bumper adds to the length of the build makes this Roadrunner look a lot more like the 1:1 car. Let's see if I can clean up the custom bumper without ruining other things!!!


Overall the body is beginning to look good. Softening some of the sharp lines of the body (using a 300 grit sanding stick) has helped. I think with the right paint and stance this build is going to come out "cool".


I ended up gluing the hood (from the Bandit Resins kit) down. I couldn't figure out how to hinge it, as this is a resin hood being mounted to a plastic body. Besides, I am a bit tired of building the same 440 Mopar motor over and over. So in the hobby parlance this is going to be a "curbside" which means "look ma, no motor!" Most important, I'm not using the "air grabber" hood from the MPC kit; I like the look of the hood from the Bandit Resins kit a lot better.

Sunday, October 25, 2009

71 Roadrunner Dash--The Silver Lining?

The good news is that any sort of craft, like building models, is good for relieving work- (or life-)related stress. I think most everyone would agree to that. The bad news is that sometimes I'm working too much to have time to do the things that relieve stress. The past 2-3 weeks have been those sorta' weeks.


I tagged along to our local Target with my wife (she needed to return something--don't know what). While she was looking around at whatever is it she looks around at I went into the "back to school" section. There I found some interesting pens made by Sharpie--"Sharpie Paint". The blister pack art said that the pens had a metallic finish and would stick to plastic. Good for modelling? Hmmm....


Having about 10 minutes between bouts of remote access to work, I got a dash out of one of the 71 Roadrunner donor kits and covered the dash with Floquil Engine Black #F110010.


If you've read earlier posts you know that I just love Floquil paints.....I then applied Silver Sharpie Paint pen. You see the results here. It doesn't look 100% right, maybe it's 50% right? It's not perfect, but this was my first attempt. If there's a finer point it might work better, and maybe masking some of the long straight lines will help.


From a distance--and since this dash will be inside a model without opening doors, no one will be able to see much no matter what--it's OK. Good enough. Since I am doing this to learn about new crafts, and get away from work, good enough is, well, good enough.

Monday, October 5, 2009

71 Plymouth Roadrunner--Resin Body Destroyed!

Another troubled day in my model car world. From previous posts: I am trying to build a "vintage" 71 Roadrunner in 1:25 scale. The build in 1:24 scale would be easy--go to the local Hobby shop, buy the Revell 1:24 1971 GTX kit, and build it. But what fun would that be? There is, or was, a 1:25 resin body available, from Bandit Resins, so I scooped it up. It's a nice body: they already kludged a good firewall/engine compartment in there while mastering it. The BR resin kit is not too cheap--I paid about $45 for the body/hood/interior tub/seats/dash; if you get it, you still need a donor kit (Bandit recommends the AMT 71 Charger) to complete the build.


Here's what I ended up with. The body itself looks a whole lot like the MPC body I already have--it wouldn't surprise me if the MPC kit was the master, or they were both mastered from the same "promo" body at one point. And!! While trying to test fit the body to the donor kit (AMT/Ertl 71 Dodge Charger #30054, no longer in production, but easily found on Ebay), disaster struck: a big crack developed in the rear passenger side quarter panel, probably when I tried to stretch the body over the chassis. Lesson learned--be gentle with resin bodies! I tried to repair that with CA glue, which warped the entire body, and then I tried to repair the warpage with warm water and twisting, which popped the passenger side A piller off. Then I gave up; bottom line: the resin body is toast. When I told this sad story to my wife she couldn't believe I didn't scream when the A piller went flying. Well, I didn't, I must be getting mellow in my old age!


So it's back to the plastic body (from MPC #6282--pretty hard/expensive to find on Ebay...and really, not a great kit....)

Oh well, the plastic body will work; I am going to use the hood from the resin kit which doesn't have the air grabber scoop arrangement...which I like better. I debonded the air grabber hood that I had already glued down and removed it; happily the engine compartment I had shoved in there was intact, so at least at this time I have options. I still need to decide if I want to glue the hood shut. I should put an engine and hinged hood into the build, but, that would be a pretty big time commitment.


The front bumper/grille remains a problem. The one that came with the MPC kit doesn't look like the 1:1 bumper/grille so forget about that one. Here is the one that came with the bandit resins kit. To me, it looks the same as the MPC grille/bumper--it has the same problems. I assume they may have both been cast from the same source.

The bumper looks like it's about 2 scale inches less deep than the 1:1 bumper; there are also no bumper mounting bolt covers visible. And, to my eyes, the headlights aren't large enough. We can do better.


So here's the bumper I created, so far; I cast this from a 71 Plymouth stock car bumper I got from Competition Resins, and then cut out the grille using a dremel tool, leaving a bit of the original grille behind to have something to mount the new grille to.


I have to figure out the headlights and grille next. The Bandit Resins GTX grille is the top one; the other is the MPC grille. I am not too crazy about either but overall like the Bandit Resin's one better (although it's a GTX, not a Roadrunner....) Best would be to scratch build this somehow, but that would be a pretty big project. My biggest challenge right now is how to do this build in the time I have; I am very busy with about a million other things. I may have to take the quick way out.

Monday, September 21, 2009

69 Superbee with Vinyl Top FINISHED!


I just finished a box-stock (almost) 1969 Superbee based on Revell's "Revell Muscle" series--kit #85-2363.


This kit was a departure for me--it's 1:24 and I haven't built anything in 1:24 for years; I did almost no customizing or scratch building, and I tried, for the first time, doing a scale vinyl top.


The engine compartment was detailed out with scratch built heater plumbing. I also cast the wiper motor and a few goodies on the inside of the firewall, as the Revell kit didn't have much detail....


The tires and "Mopar Dog Dish" wheels came from "Scale Equipment Ltd".....it might be a bit hard to tell from the photos but the decals on the tires didn't come out very well--the edges of the decals are visible if held into the light just right (or "just wrong"). I don't think I will be using tire decals again any time soon; rub on lettering looks a lot better.


OK, so here's the top...after a lot of reading I decided to give Model Masters "Black Vinyl Top Base Coat" and "Black Vinyl Top Texture Coat" a try. It came out OK....but to me the "bumps" aren't to scale (I may have held the texture coat can too far from the subject, but, I did follow the directions from Testors and held the can 18"-24" away). I also made the seams a bit too big....I need to use smaller gauge plastic rod next time.


Part numbers from Model Masters is 28153 and 28152....


Does it look better than just using mist coats of enamel? Don't know....The finished build got a bit rushed towards the end; I had a heck of a time with the stance, since Revell's stock build looked WAY too tall to me. I ended up hacking up the suspensions and just epoxying the wheels to the axles after putting in some styrene rod to allow the stance to be lowered.


The stance could come down a tad more--not sure--1:1 photos shows these things riding up a bit high.....


The vanity plates reflect the build: 1st vinyl.


Don't know what I'm going to build next--I have parts now for the Roadrunner, as well as a Duster, but I guess I am not crazy about building yet another Mopar. In fact, I am going to go out of town for a few weeks and take a break from work and hobbies. Maybe after that I will have some new ideas.

Blog Archive