Hi there if you haven't noticed there has been no post in a while.
I may move soon and to that end I need to stop building for a bit. I may not have the room in my new place I have now.
I am going to sell some or most of my unbuilt kits and stash of parts on Ebay. Once I'm settled I might be back into this. It's been a fun distraction.
Here's one more thing before I run along--if you want to finish building the 65 Chevy pickup mentioned immediately below drop me a line, if you are in Continental US I will send you the kit built so far. yes I will eat the postage. It's yours. finish it, use it for parts or whatever.
The body is still in plastic and needs a bit more prep, but other things are painted, and the interior is built.
First come, first served. See ya!
Monday, August 8, 2016
Monday, April 25, 2016
Chevy Pickup--1965--Basic model car painting Revisited
If you've been following this blog I don't think you will read much this time you haven't already read. I've been back into this silly hobby for about 10 years and the technique I use to paint regular old parts hasn't changed much for the past few years. Sorry. But just by way of review, here's how I do it--I am not some NNL or CSI or NHL or whatever it's called model champ so take it for what it's worth. And everything I say here was learned from reading or watching videos. Nothing is "original"!

First--remove all parts from sprues but where it makes sense to do so, leave a bit of sprue on there. The shocks for instance. We need some easy way to clip them to "ponzi sticks" for painting. And of course, remove all flash, debris, cross-tweeze, mold lines (every part has one) and so on. I have really gotten into good clean up. It satisfies my OCD to clean up all the grime, burrs, and dookie. Glue together what you can before painting. So far, easy right?

I know from experience that if I'm going to glue anything painted together and have it stick you have to scrape the paint away first. I hate spending a ton of time endlessly scraping paint so I have started to use more of Microscales' "Micro Mask" first. Brush some on, let it dry before you paint, and trim away what you don't want with an exacto knife. Then when it's time to scrape, just scrape a bit of the mask and (hopefully!) the whole mask comes off and you're back to bare plastic. BTW MM thins out with acrylic thinner and cleans up with water. Good stuff, but it can be hard to remove from deep crevices. So I don't use it everywhere but for chassis joints I used it pretty liberally.


Now grab up some paint. A lot of chassis and undercarriage work is flat or matt black and silver/aluminum. it's actually a bit boring, but I guess I could be making model clown figures or whatever--um, not. I have a bunch of Tamiya matt black lying around, I really like that stuff. Krylon or Duplicolor's chrome looks more like aluminum to me, but it's good enough. The green is whatever I had lying around that wasn't silver or black; I'll use for the shocks.

I paint in the back yard and then let it dry as you see here. The tools are to keep the wind from blowing the whole thing over which would really suck. What I really don't want to do is stink up my house so it'll stay outside for a while.

Now here's the trickiest thing of all. The frame assembly needs 2 or 3 coats, so I put on a thin coat and walk away. This is NOT easy to do!! But if I tried to cover this in one coat it will run and look crappy. Again, I will let it all dry outside to not stink up the house. Global warming at work!

First--remove all parts from sprues but where it makes sense to do so, leave a bit of sprue on there. The shocks for instance. We need some easy way to clip them to "ponzi sticks" for painting. And of course, remove all flash, debris, cross-tweeze, mold lines (every part has one) and so on. I have really gotten into good clean up. It satisfies my OCD to clean up all the grime, burrs, and dookie. Glue together what you can before painting. So far, easy right?

I know from experience that if I'm going to glue anything painted together and have it stick you have to scrape the paint away first. I hate spending a ton of time endlessly scraping paint so I have started to use more of Microscales' "Micro Mask" first. Brush some on, let it dry before you paint, and trim away what you don't want with an exacto knife. Then when it's time to scrape, just scrape a bit of the mask and (hopefully!) the whole mask comes off and you're back to bare plastic. BTW MM thins out with acrylic thinner and cleans up with water. Good stuff, but it can be hard to remove from deep crevices. So I don't use it everywhere but for chassis joints I used it pretty liberally.

Now it's time to "Ponzi stick" the parts. I took a bunch of wooden skewers for making shish-kabob and superglued alligator clips to one end. I clip the part (a bit I don't want painted, or can touch up later, see why you leave the sprue sometimes?) and then shove the sharp end into some styrofoam.


I paint in the back yard and then let it dry as you see here. The tools are to keep the wind from blowing the whole thing over which would really suck. What I really don't want to do is stink up my house so it'll stay outside for a while.

Now here's the trickiest thing of all. The frame assembly needs 2 or 3 coats, so I put on a thin coat and walk away. This is NOT easy to do!! But if I tried to cover this in one coat it will run and look crappy. Again, I will let it all dry outside to not stink up the house. Global warming at work!
Sunday, February 28, 2016
65 Chevy Stepside Box Stock Build: How I am Doing it These Days
OK I am sick of the AMT 69 Chevelle rebuild so I put it aside am and going to build something a lot easier. A box stock Revell 1:25 pickup...that I bought a few months ago....will fill the bill.

Pickups are easy, I think, because they don't have a lot of trim that needs bare metal foil, have nice large bodies that make painting pretty easy, and relatively square surfaces that make sanding and prep go fast. I got this Revell "Trucks!" kit, 85-7210, at a Walmart Blowout for eight bucks! OK, no mods, no tricks, just a basic box stock build right?

I imagine if you get 100 builders together they will have 100 different ways to do a box stock build. For me, first thing I do is take out all the "white plastic" (non clear, non chome etc.) and wash it with warm water and dish soap and let it dry. I have read this gets rid of mold release agents and other chemicals on the parts. In reality, I have skipped this step many times and not seen a heck of a lot of difference.

Next up I go through each step in the directions, cut the parts from the sprues, and bag each group of like parts. Yo!! So: one bag. for the interior, one for the engine, one for the body parts, etc. Sometimes I will leave a bit of sprue somewhere to help with painting (more on this next time, and I have talked about this before).
I like doing prep work in batches, like trimming parts from sprues, otherwise I am picking up my sprue cutter 100000 times during the build vs. just blasting it all out at once.

Next it's clean up time....I go through every part--yes, every single one, and get rid of mold lines, flash, ejector pins, and any other gremlin I can find. Even if I think the part's defect will be invisible! For this I use a series of files and sandpaper, putty, and glue. And if I work efficiently it goes pretty fast.

This particular kit was remarkably free from flash and mold lines. However there are some ejector pins or ejector holes or ejection donuts whatever you call them all over. My understanding is that these are used during the casting process to "shoot the parts out of the mold". And little disk is visible from whatever is used to do the shooting.
Revell's craftsmen were careful to try to put these ejector holes on a non visible surface, but they can affect parts fit, and they always bug me, so I get rid of all of 'em anyway. Sometimes they easily sand or file out, but in this case, for this particular body part, they were really deep, so I am using Tamiya Light Curing putty, which dries relatively quickly and is easy to sand out when it's dry. I apply this, let it bake overnight, and then run some sanding sticks over it.

Sink marks are another thing to watch for. As I understand this: this is when the cast part "sags" a bit while cooling off. You don't want these--they look bad, can affect parts fit, and in general drive me crazy. Fortunately this kit didn't have a lot of sink marks; some of the older AMT kits or whatever have a ton, but this kit was pretty good. Again, light curing putty and files to the rescue.

OK! once the cleanup is done, I will unbag the parts groups and start test fitting. Here, I am trying out the exhaust/axle/frame fit, because I have seen this be extremely problematic on a lot of kits. For this build, the exhaust pipe setup wasn't documented well, but it looks like it will glue up OK without heating and rebending, which is nice.

And of course the body needs extra attention, always--this is what everyone sees! This particular kit has a lot of body parts, I count 13. Since I want to try to paint this as a unit, I am going to preassemble it and clean it up once glued.

Here's what I have after some gluing. The hood fit is dicey; it almost always is, and is going to need some more work.

That's a big seam, so big you can drive a truck through it; But this is a truck, so perhaps you can drive it through itself? Something like that. The hood is a 4 piece affair. I know it has to be sturdy or will fall apart when I try to clean it up. So I glued it from the inside and will let it dry overnight before trying to fill in the above seam and try to improve the fit. The complex shape will make this a bit tricky, but i figure I will manage.
Next time: prep for paint.
Saturday, February 13, 2016
69 Chevelle--Oh You're No FUN Anymore
For the handful of folks following this blog you may have noticed no posts lately! The attempt to modernize the AMT 69 Chevelle 1:25 kit is driving me crazy....to the point where, no model making for the past couple of months. It feels like more work on this build would be a waste of time.

So here's what I have so far. The body has been worked over a few times, wheel flares added (because the originals on the AMT kit, and I bought two of them) stunk. OK that was some work, and in doing that, the body began to warp. So I got out the chassis I will mate this to--from an AMT 69 Olds, that had more "modern tooling", and banded it all together.

In the meantime I went to work on seats. The ones provided by the AMT kit look nothing like the 1:1 originals, and leave out basics like the seat headrests, clearly visible on the box art. The Olds seats are closer, but still not a perfect match. (Sorry.) I razor sawed out the center console and glued the seats to it, filling in the gaps with some .01 sheet styrene. Since I am considering probably never touching a plastic model again, this will have to do.

The hits keep coming! The ejector pins are everywhere in the AMT Chevelle kit. At least this time they didn't put the pin right over the floor matte. Lucky day. This will have to be filed out, and the "carpeting" redone, probably with embossing material.

And of course the priming I did looks like cottage cheese. You have to prime body reworks like this several times, and it only takes one bad round to have it come out like this. So it all has to be sanded and reprimed.

Overall I am at the end of my rope here. I could spend endless hours on this build, and then have Revell put out a new tool of it that kicks my work's butt. I am not sure there is any point. I may put this one up on the shelf again, and then think about selling off my paints, kits, and tools.

And, the molding on the dash and firewall look like they were from the Jurassic period; a lot of work will be needed to get this to an acceptable level of details. To me this just isn't that fun any longer. If you don't see another post for a few months this is why. I am not sure if I am just going to shelve this project or give up on the entire hobby for awhile.
Tuesday, November 17, 2015
66 El Camino-FINISHED!
Another month gone, another model done! This time a Revell 66 El Camino. I ended up building it box stock except for the wheels (from the AMT 69 Chevelle) and the wheels (from my scrap box, no idea where they came from?). A tiny bit of photo etch was used, for the door locks, for instance.

Beyond that? Nothing new to report here. This was another pretty easy build, a good kit that went together easily.

I'm trying, as always to keep things clean, and to make the most of the little time I have to build these days. I could have spent more time on the photo lighting, but, there you go.

Not much to say, except, after 10 years now of being back in the hobby, my skills I feel have improved a bit. This was a fun build and came out pretty clean.

The key it seems is to be patient. That's the center of success in this hobby: Extremely patient. Silly patient. Simple stuff: Always scrape the paint off, and get down to "bare plastic", before the glue goes on. Try to line things up before the glue dries. And: Try to let one assembly dry before trying to stick on the next thing.

So what next? Back to the 69 Chevelle I guess, which, if nothing else, will be more challenging. I guess?
Thursday, September 24, 2015
Pain in the Glass Parts #13 and 35
You'd think after 10 years of being back in the hobby I could put in a windshield without making a huge mess, but if you do, think again. The glass for the 66 Chevelle needed to go in and I found myself procrastinating. Like Bare Metal Foil, scale glass can be a pain and if I don't do it, I won't screw it up.

But the damn model won't be done either. So here's my current technique. First, I cut the plastic glass of the sprues and immediately bag it up or wrap it up. I can't tell you how many times I've scratched or damaged the glass before I even attempt to glue it into the model.

Next up using a #11 e-xacto I scrape anywhere I need to add glue. It's been my experience, and you should message me if you think I'm wrong, that NO modelers glue, ANYWHERE will penetrate paint (or chrome, for that matter). So very delicate scraping, like the A pillar here, is in order, and patience as always is the key.

It's not quite glue time. But let's talk glues. Right now my favorite for glass work is Microscale's Micro Kristal Klear. I have tried (I think) all of them out there--Testor's glass glue, Testor's stinky red, watch crystal glue, epoxy, Elmer's. etc. Even CA, which of course you can't use because the fumes turn the clear glass white (learned that one the hard way). In fact when you are working with any plastic glass, anywhere in the room, don't even squeeze a drop of CA out of the tube. The fumes can ruin the glass (as well as you brain!) so stay away!

Thank goodness, it's still almost time to glue, but not quite. Get some 3M clear scotch tape and a dispenser, get some tape, and stick it on and off your pant's leg a few times. You want it to be tacky, but not too tacky.

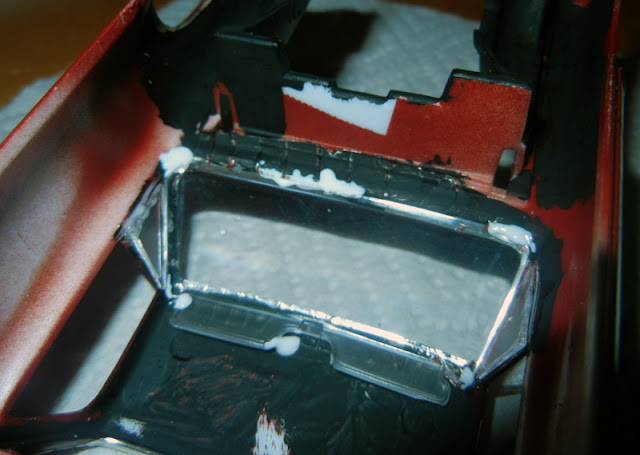
Here's the trick. Tape the glass into place, make sure it looks OK, then with a toothpick, dab some of the MKK in place. Just a bit. Let it dry, and then remove a piece of tape, then put down some more glue. Repeat until the window is secure (in this case, the quarter pane) and all tape has been removed. Yes, this takes a lot of time, especially when you have a lot of glass to glue in, and yes, you have to be very patient. And yes, if the tape is too sticky you can pull the entire glass out. It takes practice.

The windshield going in after the quarter pane is dry. It's a rare windshield that goes in without a lot of tape, and a fair amount of fear and loathing. Best to just set some glue and then walk away for a few hours.

One of the best things about MKK is that until it is completely dry, which means maybe 24 hours, you can clean it and thin it with Tamiya X-20A thinner. So if you do make a mess, you can fix things. Of course, if you are applying X20A as a cleaning agent over a surface painted with Acrylic, the acrylic paint might come off as well, exposing the plastic beneath. Bummer. Doesn't model making suck?
Saturday, August 15, 2015
66 El Camino: Space Normal Speed
I remain indolent about building a big project, turning a poorly tooled AMT 69 Chevelle into something that is respectable. Instead, I am spending a few minutes here and there, mostly before heading to the bus for work, on a newer tooled kit, a Revell 66 El Camino, and building it pretty much box stock.


The body was painted with Testors One Coat Lacquer Maroon and One Coat clear, 2 coats each, and polished with the same stuff I always use. Airbrush? We don't need no stinking airbrush!


Subscribe to:
Posts (Atom)